
이벤트 객체
이벤트가 발생하면 이벤트에 관련한 다양한 정보를 담고 있는 이벤트 객체가 동적으로 생성된다. 생성된 이벤트 객체는 이벤트 핸들러의 첫 번째 인수로 전달된다.
1
2
3
4
5
6
7
8
9
10
11
12
13
14
15
16
17
18

    <!DOCTYPE html>
    <html>
    <body>
        <p>click</p>
        <em class="message"></em>
        <script>
            const $msg = document.querySelector('.message');

            function printXY(e) {
                $msg.textContent = `clientX: ${e.clientX}, clientY: ${e.clientY}`;
            }

            document.onclick = printXY;
        </script>
    </body>
    </html>
이벤트에 의해 생성된 이벤트 객체는 이벤트 핸들러의 첫 번째 인수로 전달되어 매개변수 e에 암묵적으로 할당된다. 이벤트 객체를 전달받으려면 이벤트 핸들러를 정의할 때 이벤트 객체를 전달받을 매개변수를 명시적으로 선언해야 한다.
이벤트 핸들러 어트리뷰트 방식으로 이벤트 핸들러를 등록한 경우 아래와 같이 이벤트 객체를 전달받을 수 있다.
1
2
3
4
5
6
7
8
9
10
11
12
13
14
15
16
17
18
19
20
21

    <!DOCTYPE html>
    <html>
    <head>
        <style>
            html, body { height: 100%; }
        </style>
    </head>
    <body onclick="printXY(event)">
        <p>click</p>
        <em class="message"></em>
        <script>
            const $msg = document.querySelector('.message');

            function printXY(e) {
                $msg.textContent = `clientX: ${e.clientX}, clientY: ${e.clientY}`;
            }
        </script>
    </body>
    </html>
이벤트 핸들러 어트리뷰트 방식의 경우 이벤트 객체를 전달받으려면 이벤트 핸들러의 첫 번째 매개변수 이름을 반드시 event이어야 한다. 만약 다른 이름으로 매개변수를 선언하면 이벤트 객체를 전달받지 못한다.
이벤트 전파
DOM 트리 상에 존재하는 DOM 요소 노드에서 발생한 이벤트는 DOM 트리를 통해 전파된다. 이를 이벤트 전파라고 한다.
생성된 이벤트 객체는 이벤트를 발생시킨 DOM 요소인 이벤트 타깃을 중심으로 DOM 트리를 통해 전파된다. 이벤트 전파는 이벤트 객체가 전파되는 방향에 따라 다음과 같이 3단계로 구분할 수 있다.
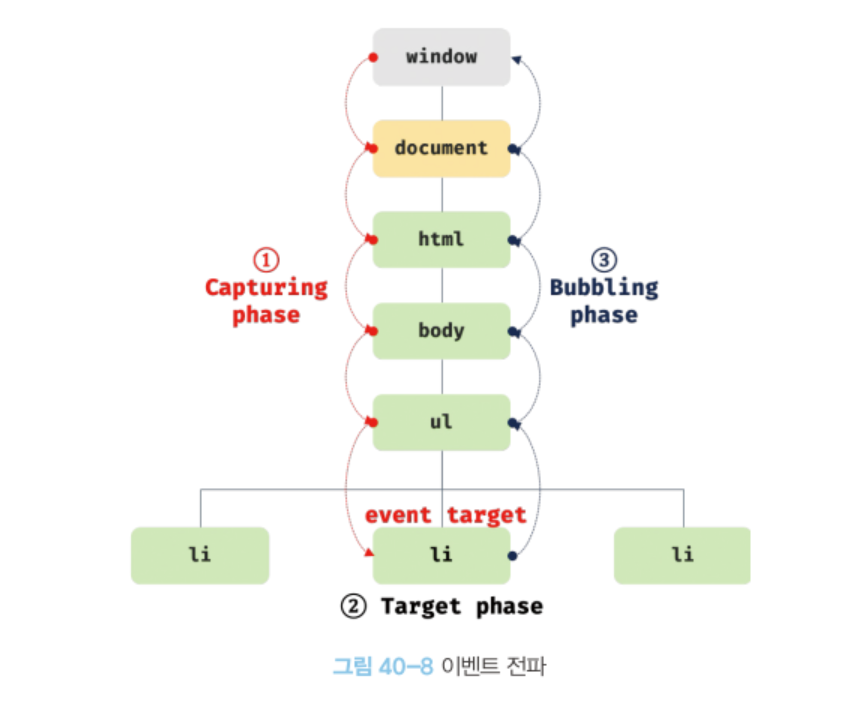
캡처링 단계 : 이벤트가 상위 요소에서 하위 요소 방향으로 전파
타깃 단계 : 이벤트가 이벤트 타깃에 도달
버블링 단계 : 이벤트가 하위 요소에서 상위 요소 방향으로 전파
이벤트 핸들러 어트리뷰트/프로퍼티 방식으로 등록한 이벤트 핸들러는 타깃 단계와 버블링 단계의 이벤트만 캐치할 수 있다. 하지만 addEventListener 메서드 방식으로 등록한 이벤트 핸들러는 타깃 단계와 버블링 단계뿐만 아니라 캡처링 단계의 이벤트도 선별적으로 캐치할 수 있다. 캡처링 단계의 이벤트를 캐치하려면 addEventListener 메서드의 3번째 인수로 true를 전달해야 한다. 3번째 인수를 생략하거나 false를 전달하면 타깃 단계와 버블링 단계의 이벤트만 캐치할 수 있다.
1
2
3
4
5
6
7
8
9
10
11
12
13
14
15
16
17
18
19
20
21
22
23
24
25
26
27
28
29
30
31
32
33
34

    <!DOCTYPE html>
    <html>
    <body>
        <ul id="ul">
            <li id="aaa">aaa</li>
            <li id="bbb">bbb</li>
            <li id="ccc">ccc</li>
        </ul>
        <script>
            const $ul = document.getElementById('ul');
            const $aaa = document.getElementById('aaa');

            $ul.addEventListener('click', e => {
                console.log(`이벤트 단계: ${e.eventPhase}`);    // 캡처링 단계
                console.log(`이벤트 타깃: ${e.target}`);
                console.log(`커런트 타깃: ${e.currentTarget}`);
            }, true);

            $aaa.addEventListener('click', e => {
                console.log(`이벤트 단계: ${e.eventPhase}`);    // 타깃 단계
                console.log(`이벤트 타깃: ${e.target}`);
                console.log(`커런트 타깃: ${e.currentTarget}`);
            });

            $ul.addEventListener('click', e => {
                console.log(`이벤트 단계: ${e.eventPhase}`);    // 버블링 단계
                console.log(`이벤트 타깃: ${e.target}`);
                console.log(`커런트 타깃: ${e.currentTarte}`);
            });
        </script>
    </body>
    </html>
이벤트는 이벤트를 발생시킨 이벤트 타깃은 물론 상위 DOM 요소에서도 캐치할 수 있다. DOM 트리를 통해 전파되는 이벤트는 이벤트 패스에 위치한 모든 DOM 요소엥서 캐치할 수 있다.
이벤트 위임
이벤트 위임은 여러 개의 하위 DOM 요소에 각각 이벤트 핸들러를 등록하는 대신 하나의 상위 DOM 요소에 이벤트 핸들러를 등록하는 방법을 말한다. 이벤트 전파에서 살펴본 것 처럼 이벤트는 이벤트 타깃은 물론 상위 DOM 요소에서도 캐치할 수 있다. 이벤트 위임을 통해 상위 DOM 요소에 이벤트 핸들러를 등록하면 여러 개의 하위 DOM 요소에 이벤트 핸들러를 등록할 필요가 없다. 또한 동적으로 하위 DOM 요소를 추가하더라도 일일이 추가된 DOM 요소에 이벤트 핸들러를 등록할 필요가 없다.
1
2
3
4
5
6
7
8
9
10
11
12
13
14
15
16
17
18
19
20
21
22
23
24
25
26
27
28
29
30
31
32
33
34
35
36
37
38
39
40
41
42
43
44
45
46
47
48
49

    <!DOCTYPE html>
    <html>
    <head>
        <style>
            #ul {
                display: flex;
                list-style-type: none;
                padding: 0;
            }

            #ul li {
                width: 100px;
                cursor: pointer;
            }

            #ul .active {
                color: red;
                text-decoration: underline;
            }
        </style>
    </head>
    <body>
        <nav>
            <ul id="ul">
                <li id="aaa" class="active">aaa</li>
                <li id="bbb">bbb</li>
                <li id="ccc">ccc</li>
            </ul>
        </nav>
        <div>Select li: <em class="msg">aaa</em></div>
        <script>
            const $ul = document.getElementById('ul');
            const $msg = document.getElementById('.msg');

            function activate({ target }) {
                if(!target.matches('#ul > li')) return;

                [...$ul.children].forEach($ul => {
                    $ul.classList.toggle('active', $ul === target);
                    $msg.textContent = target.id;
                });
            }

            $ul.onclick = activate;
        </script>
    </body>
    </html>
이벤트 위임을 통해 하위 DOM 요소에서 발생한 이벤트를 처리할 때 주의할 점은 상위 요소에 이벤트 핸들러를 등록하기 때문에 이벤트 타깃, 즉 이벤트를 실제로 발생시킨 DOM 요소가 개발자가 기대한 DOM 요소가 아닐 수 도 있다는 것이다.
일반적으로 이벤트 객체의 target 프로퍼티와 currentTarget 프로퍼티는 동일한 DOM 요소를 가리키지만 이벤트 위임을 통해 상위 DOM 요소에 이벤트를 바인딩한 경우 이벤트 객체의 target 프로퍼티와 currentTarget 프로퍼티가 다른 DOM 요소를 가리킬 수 있다.
이벤트 핸들러 내부의 this
이벤트 핸들러 어트리뷰트의 값으로 지정한 문자열은 암묵적으로 생성되는 이벤트 핸들러의 문이다. 따라서 일반 함수로 호출된다. 일반 함수로서 호출되는 함수 내부의 this는 전역 객체를 가리킨다. 따라서 이벤트 핸들러 어트리뷰트로 지정한 이벤트 핸들러의 this는 전역 객체 window를 가리킨다.
단, 이벤트 핸들러를 호출할 때 인수로 전달한 this는 이벤트를 바인딩한 DOM 요소를 가리킨다.
1
2
3
4
5
6
7
8
9
10
11
12
13
14

    <!DOCTYPE html>
    <html>
    <body>
        <button onclick="handleClick(this)">Click</button>
        <script>
            function handleClick(button) {
                console.log(button);    // button 요소
                console.log(this);      // window
            }
        </script>
    </body>
    </html>
이벤트 핸들러 프로퍼티 방식과 addEventListener 메서드 방식 모두 이벤트 핸들러 내부의 this는 이벤트를 바인딩한 DOM 요소를 가리킨다. 즉, 이벤트 핸들러 내부의 this는 이벤트 객체의 currentTarget 프로퍼티와 같다.
1
2
3
4
5
6
7
8
9
10
11
12
13
14
15
16
17
18
19
20
21
22
23
24
25
26
27
28
29

    <!DOCTYPE html>
    <html>
    <body>
        <button class="btn1">0</button>
        <button class="btn2">0</button>
        <script>
            const $button1 = document.querySelector('.btn1');
            const $button2 = document.querySelector('.btn2');

            // 이벤트 핸들러 프로퍼티 방식
            $button1.onclick = function (e) {
                console.log(this);                      // $button1
                console.log(e.currentTarget);           // $button1
                console.log(this === e.currentTarget);  // true
                ++this.textContent;
            };

            // addEventListener 메서드 방식
            $button2.addEventListener('click', function (e) {
                console.log(this);                      // $button2
                console.log(e.currentTarget);           // $button2
                console.log(this === e.currentTarget);  // true
                ++this.textContent;
            });
        </script>
    </body>
    </html>
화살표 함수로 정의한 이벤트 핸들러 내부의 this는 상위 스코프의 this를 가리킨다. 화살표 함수는 함수 자체의 this 바인등을 갖지 않는다.
1
2
3
4
5
6
7
8
9
10
11
12
13
14
15
16
17
18
19
20
21
22
23
24
25
26
27
28
29
30
31

    <!DOCTYPE html>
    <html>
    <body>
        <button class="btn1">0</button>
        <button class="btn2">0</button>
        <script>
            const $button1 = document.querySelector('.btn1');
            const $button2 = document.querySelector('.btn2');

            $button1.onclick = e => {
                // 화살표 함수 내부의 this는 상위 스코프의 this
                console.log(this);                      // window
                console.log(e.currentTarget);           // $button1
                console.log(this === e.currentTarget);  // false

                // this는 window를 가리키므로 window.textContent에 NaN을 할당한다.
                ++this.textContent;
            };

            $button2.addEventListener('click', e => {
                console.log(this);                      // window
                console.log(e.currentTarget);           // $button2
                console.log(this === e.currentTarget);  // false

                ++this.textContent;
            });
        </script>
    </body>
    </html>
클래스에서 이벤트 핸들러를 바인딩하는 경우 this에 주의해야 한다. 클래스 메서드 내부의 this는 클래스가 생성할 인스턴스를 가리키지 않는다. 이벤트 핸들러 내부의 this는 이벤트를 바인딩한 DOM 요소를 가리키기 때문에 클래스 메서드 내부의 this는 이벤트 핸들러가 바인딩된 요소를 가리킨다. 따라서 클래스 메서드를 이벤트 핸들러로 바인딩할 때 bind 메서드를 사용해서 this를 전달하여 클래스 메서드 내부의 this가 클래스가 생성할 인스턴스를 가리키도록 해야 한다.
1
2
3
4
5
6
7
8
9
10
11
12
13
14
15
16
17
18
19
20
21
22
23

    <!DOCTYPE html>
    <html>
    <body>
        <button class="btn">0</button>
        <script>
            class App {
                constructor() {
                    this.$button = document.querySelector('.btn');
                    this.count = 0;

                    this.$button.onclick = this.increase.bind(this);
                }
                increase() {
                    this.$button.textContent = ++this.count;
                }
            }

            new App();
        </script>
    </body>
    </html>
이벤트 핸들러에 인수 전달
이벤트 어트리뷰트 방식은 함수 호출문을 사용할 수 있기 때문에 인수를 전달할 수 있지만 이벤트 핸들러 프로퍼티 방식과 addEventListener 메서드 방식의 경우 함수 호출문이 아닌 함수 자체를 등록해야 한다. 따라서 인수를 전달할 수 없다. 이 경우 이벤트 핸들러 내부에서 함수를 호출하면서 인수를 전달한다.
1
2
3
4
5
6
7
8
9
10
11
12
13
14
15
16
17
18
19
20
21
22
23

    <!DOCTYPE html>
    <html>
    <body>
        <label>User name <input type='text'></label>
        <em class='message'></em>
        <script>
            const MIN_USER_NAME_LENGTH = 5;
            const $input = document.querySelector('input[type=text]');
            const $msg = document.querySelector('.message');

            const checkUserNameLength = min => {
                $msg.textContent
                = $input.value.length < min ? `이름은 ${min}자 이상 입력해 주세요` : '';
            };

            $input.onblur = () => {
                checkUserNameLength(MIN_USER_NAME_LENGTH);
            };
        </script>
    </body>
    </html>
또는 이벤트 핸들러를 반환하는 함수를 호출하면서 인수를 전달할 수 있다.
1
2
3
4
5
6
7
8
9
10
11
12
13
14
15
16
17
18
19
20
21
22
23

    <!DOCTYPE html>
    <html>
    <body>
        <label>User name <input type='text'></label>
        <em class='message'></em>
        <script>
            const MIN_USER_NAME_LENGTH = 5;
            const $input = document.querySelector('input[type=text]');
            const $msg = document.querySelector('.message');

            // 이벤트 핸들러를 반환하는 함수
            const checkUserNameLength = min => e => {
                $msg.textContent
                = $input.value.length < min ? `이름은 ${min}자 이상 입력해 주세요` : '';
            };

            // 이벤트 핸들러를 반환하는 함수를 호출하면서 인수를 전달
            $input.onblur = checkUserNameLength(MIN_USER_NAME_LENGTH);
        </script>
    </body>
    </html>